The Fabrique Nationale SA22

One quick job recently was strip and clean a 1958 Fabrique Nationale .22LR Semi Automatic Take Down rifle. My views on these little rifles is well documented, I am a real fan of them and we have a couple here with the other being a 1956 model. The differences are subtle such as a slightly different safety button and the 1956 model trigger set is numbered, also the charging handle on the point is a different profile and the claws to hold the magazine follower differ slightly.

The  task was simply to strip, clean and inspect and the process is wonderfully simple, push the small barrel latch on the underside Watford, slide the bolt back using the catch on the underside, twist the barrel 90 degrees and you have a rifle in two pieces. Now hook your thumb into the trigger guard, slide the bolt back towards the guard and push the whole trigger and guard assembly and you now have your rifle in three pieces. It is probably quicker to do than it took you to read this paragraph.

Time to remove the bolt from the lower trigger assembly, there are two springs, the one to the right hand side is the recoil spring, I always remove this one first by rocking the bolt up slightly and hooking the clevis end out, take care as it has every chance of becoming a ‘PingDammit (Yes, the polite version) Once that is out you can push the firing pin spring forward and hook it out and finally remove the bolt, a flat bladed screw driver is a perfect tool for these operations. Alternatively you can frantically tug and rattle the bolt and with luck everything will fly apart. I would not recommend this approach regardless of what you see on the internet, this is a Browning designed rifle and should be treated with the according reverence.

Fascinating isn’t it, we now have a rifle fully stripped for cleaning without recourse to any form of tools and you can actually get this far with your fingers. Next stage is drop the  removable cartridge guide out, it is held in place with a spring which can be pushed to the side, probably time to resort to a penknife at this stage, also there is the cartridge stop which has a tendency to fall unnoticed during cleaning anyway however if not invert the receiver and give it a hard smack on the upper surface and it should drop out.

How remarkable is that? The rifle is stripped for a thorough cleaning with your fingers and a trusty penknife, I have nothing but respect for John Moses Browning.

US1083384-0This particular rifle was well gummed up, semi auto rifles are filthy things after a few hundred shots and always benefit from a good clean. I used Paraffin and a soft brush to remove the worst of the fouling followed by an old tooth brush and some rag. It is worth taking your time and do keep an eye on the parts, I should have used an old tobacco tin in keeping with the age of the rifle and the strip for US1083384-1cleaning procedure.

Re-assembly is a reversal of the strip down and points of care are the cartridge stop which is probably best relocated with some nosed pliers, other than that you could get away US1083384-2with your trusty small pocket knife. I did take some pictures along the way however I messed something up and ended up with an empty image folder on the camera and yes, I did take the lens cap off!

In the absence of working images here are some copies of the original Browning patent first filed on November 19th 1912 to show the rifle workings.

In keeping with the rifle’s age an old Leg of Mutton case was found and the rifle fitted neatly inside.

So how did it shoot? One rule I have for a rifle I have not shot before is wear safety glasses, mine are the wrap round bi-focal type because I am at an age where I need them to see what I am doing close up. So glasses on, ten rounds down the tube, follower spring in place I cocked the rifle and keeping my left hand well forward of the ejection port in the bottom of the receiver to prevent any hot brass disappearing down my sleeve I pulled the trigger and repeated quickly. 10 rounds down range flawlessly, what an absolutely superb little rifle 🙂

As a comparison we had a second FN with us, this time a 1956 model which had not received such loving cleaning attention and looks to have had a reasonably hard life. I had checked the operation and barrel and that was all, 10 rounds cycled well and it also cycled subs very nicely so we attached a cheap rimfire scope to the receiver dovetail and shot it for zero. A few inches high right at 25m and once zeroed it shot superbly well albeit with very occasional feed issues (I did say it had not been cleaned)

I do like these little FN take downs 🙂

The Ross M1910 MkIII Bolt

This is an important subject so I am going to labour over it somewhat and you have some pictures to refer to if you ever feel the need to disable a Ross M1910 MkIII rifle bolt or indeed need to confirm if it is correctly assembled or not.

OK, so those of you who are not familiar with the Ross rifle are probably wondering what it is and wondering what is so important about it’s bolt assembly. Well, the Ross rifle was initially standard issue to the Canadian Army during the Great War. Designed by Sir Charles Ross the rifle was a straight-pull rotating bolt lug design and was first accepted by the Canadian Army in 1903 where he was successful in achieving an initial order for 12,000 units.

The operation of the bolt is based upon an internal screw that rotates the bolt head and locking lugs into battery counter clockwise (Viewed from rear) Being of straight pull operation the bolt is simply pulled back to eject the fired case. Downsides included primary extraction and the design was prone to jamming up in dusty or muddy conditions. On a plus side the Ross rifles had a reputation for good accuracy and fine tolerances. There was also a more alarming potential issue.

OK, back to the bolt, surely if it is wrong it will not go together correctly or will not operate? Well this is often the case with many rifle bolts however the Ross MkIII can be assembled incorrectly, appear to go into battery and operate in that the sear will drop, the firing will move forward and strike the primer and you know the rest, apart from the bolt although forward does not have it’s lugs engaged and can and will be blown back under the pressure of the cartridge ignition.

Legend has it the bolt will fly back, smash the bolt release catch and strike the shooter with extreme consequences, this is documented to the extent that the Canadian soldiers who were issued a Ross rifle would drop the Ross and grab an SMLE at the first opportunity.

The Canadian Army eventually adopted the SMLE No1 Mk3 and all was good again.

Lets take a closer look at the bolt itself. This article is about the M1910 MkIII and the first thing you need to know is do you have a MkIII in your hands. Well if it has an external magazine then it is almost certainly a MkIII, the downside is just because there is no apparent external magazine does not mean it is not a MkIII so keep reading.

Removal is simple enough, the bolt release catch is located to the left hand side of the rear sight bracket and is rotated down 90 degrees to allow the bolt to be removed. Ross MIIIdNow take a good look at the bolt, this is the first check to see if you have an original M1910 MkIII bolt that has not been modified to prevent incorrect reassembly. The red circle with an arrow pointing to it in this picture shows where the retrofitted stud/pin should be, if you can see a flush stud in this area then your rifle has been modified to prevent incorrect assembly. This particular Ross has been sporterised and now has some colour case hardening on the bolt body, it is also missing the stud so it has the potential to bite.

Stripping the bolt is as follows.

Remove the extractor claw by prising it out of its groove on the bolt head and sliding it out of the slot in the side of the bolt, I say prise however you should only be using your fingers at this stage and it does not take a lot off effort to remove the extractor.

Now we need to strip the bolt, take a look at the back of the bolt and you will see the cocking piece and the rear of the firing pin protruding out from it, the firing pin has a small hole in it and this allows you to push something through it to pull the firing pin and cocking piece back, I have a natty little tool which has a T bar at one end and a 90 degree hook at the other end that allows the cocking piece to be pulled back with ease. Downside is it was not on the bench, or in the rack or on the shelf or anywhere to be seen so I used a small T Handled Hex Key instead.

As you pull everything back with your T handled hex/piece of wire/something pointy you will notice a cross pin, hold the bolt body in your left hand, the cocking piece in your right and push the cross pin out, it comes out with ease assuming you have a third hand, alternatively you can use a suitable punch facing up in a vice and push down on the punch with the whole assembly to remove the cross pin or find yourself a Viking at hand who will tap the pin out. Keep an eye on where it goes…

Slide the cocking piece off the firing pin and you can now unscrew the bolt inner tube from the outer body by rotating out.

Finally you need to unscrew the retaining screw from the rear of the bolt inner tube, take care this is under tension from the firing pin. You could use some needle pointed pliers however if you have an SMLE firing pin removal tool it can be used and albeit not a perfect fit it works adequately. At this point I would suggest making yourself a dedicated tool if you plan on stripping Ross bolts down on a weekly basis.

Ross MIIIaBeware, sitting under the retaining screw is a small anti rotation plate that is easily lost so keep an eye on it. You can now remove the firing pin and spring and you should end up with something a bit like this picture.

You can now take your time to clean and inspect the individual components, cleaning is important because whilst you are cleaning you are looking and this is the time to discover any potential issues.

Once everything has been cleaned and inspected it can be reassembled by reversing the procedure.

STOP!!! This is where you really need to pay attention to a couple of areas if you wish to grow old disgracefully.

Starting with the firing pin, lightly oil it if you wish, replace the spring and slide the assembly in Ross MIIIcthe rear of the inner tube, it will need to be locked in place and to do this slide the anti rotation plate down the firing pin paying attention to it’s orientation, on one side are two small protrusions which engage with two grooves in the retaining screw. The anti rotation plate has a small protrusion on the outer edge which engages into a groove in the inside of the inner tube. Take a close look and you will see what I mean.

Ross MIIIbUse your SMLE tool or whatever to screw the retaining screw into the body and make sure it finishes aligned with the anti rotation plate and flush or just below the surface of the inner tube assembly.

Time to put the inner tube into the bolt body. This reminds me of timing the safety on the SMLE, it is either right first time or you end having a few goes, I can usually get the SMLE safety right first time. This particular Ross bolt took a dozen attempts to get it correctly timed which means every time I failed to time it correctly it would still have gone together and appear to be correct, in fact it would function as normal other than it would probably kill the shooter. The correct orientation of the rotating bolt head is as per the first image in this article, see how the lugs face up and down and you can see three ‘Teeth’. This is the correct orientation.

Once you are happy that the bolt inner tube is correctly timed to the body it is time to fit the cocking piece, slide it over the rear of the firing pin, now insert something suitable into the hole inRoss MIIIe the rear of the firing pin and pull the firing pin out as far as it will go, you are pulling against the firing pin spring so take care. Now rotate the firing pin in the cocking piece until you see a cut out in the firing pin. At this point you simply need to push the cross pin into place and the cocking piece is locked to the firing pin. This picture shows the cross pin in place.

Finally refit the extractor claw by sliding it into the groove in the bolt body and pinging it over the bolt head and into the bolt head groove, use you fingers as you have more feeling and are less likely to snap the claw off. You can now replace the bolt into the receiver.

Time for one final check. You will need to rotate the bolt head by 90 degrees in order to enable it to slide in the raceway on the receiver, as you do this the bolt inner tube will rotate forwards and when fitted in the rifle you should see a gap between the bolt body and the bolt head shown in the areas circled in red below. If you do not have a bolt that looks like this something is very wrong and you need to strip and re-time the bolt.

There is one final check to make. As the bolt engages into the counter lugs it will start to rotate up, anti clockwise as viewed from the rear, with some care you can see this happen and it is a good final check to confirm correct operation.

Ross MIIIf

All that is left now is to get it down the range and shoot it as all rifles are designed to do.

Enjoy however do take care as well please,

Notes on stripping and re-assembling the Gewehr88 Commission rifle

I will assume you have suitable tools for the job and in addition wear some safety glasses just in case you decide to follow my notes be warned, these are my notes for my rifle and I may have missed or not recorded something critical so if in doubt ask a grown up 🙂

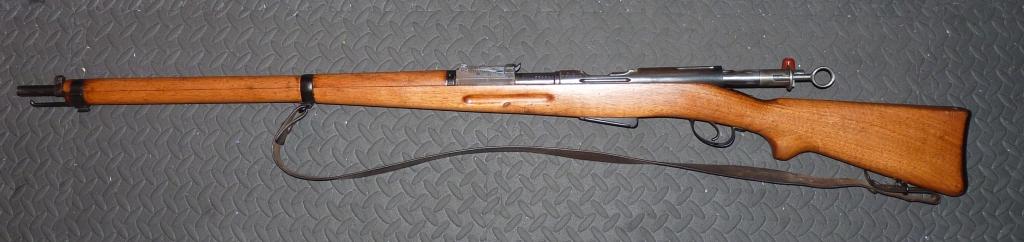
As I have mentioned already I now have a Gewehr 88/05 here and decided to take some time out this afternoon to take a closer look at what I have, dismantle, clean and inspect the rifle thoroughly and make some notes. I am a great believer in looking with my hands and thoroughly cleaning everything as this is the time when any potential issues will be spotted.

Removing the barrelled action from the stock: All you should need at this stage are a couple of flat bladed screwdrivers and some patience. Do remember when stripping a Gewehr88 that these are 120+ year old service rifles so use the correct fitting tools and take your time and if something is tight or not immediately obvious stop and research the problem. The rifle has lasted this long and you should consider yourself the custodian not the owner, accordingly just think of it as if you were working on someone else’s rifle.

First job, make sure the rifle is safe and remove the bolt.

Unscrew the cleaning rod and remove it then unscrew the front band retaining screw and push the front end off the stock. It may be tight so use a drift if needed, I have an assortment of brass and steel drifts and punches that I use and I supplement these with hard wood drifts. I make all of my own tools of this type however you can always buy a brass punch set and cut a piece of hard wood or even a piece of hard nylon to size to act as a drift for things like barrel bands.

With the front band removed, depress the catch in front of the rear band and slide it forward taking care not to scuff the stock.

Now slacken and remove the two trigger guard/magazine screws and rock the barrelled action from the stock, take your time as it is easy to chip the stock at this stage.

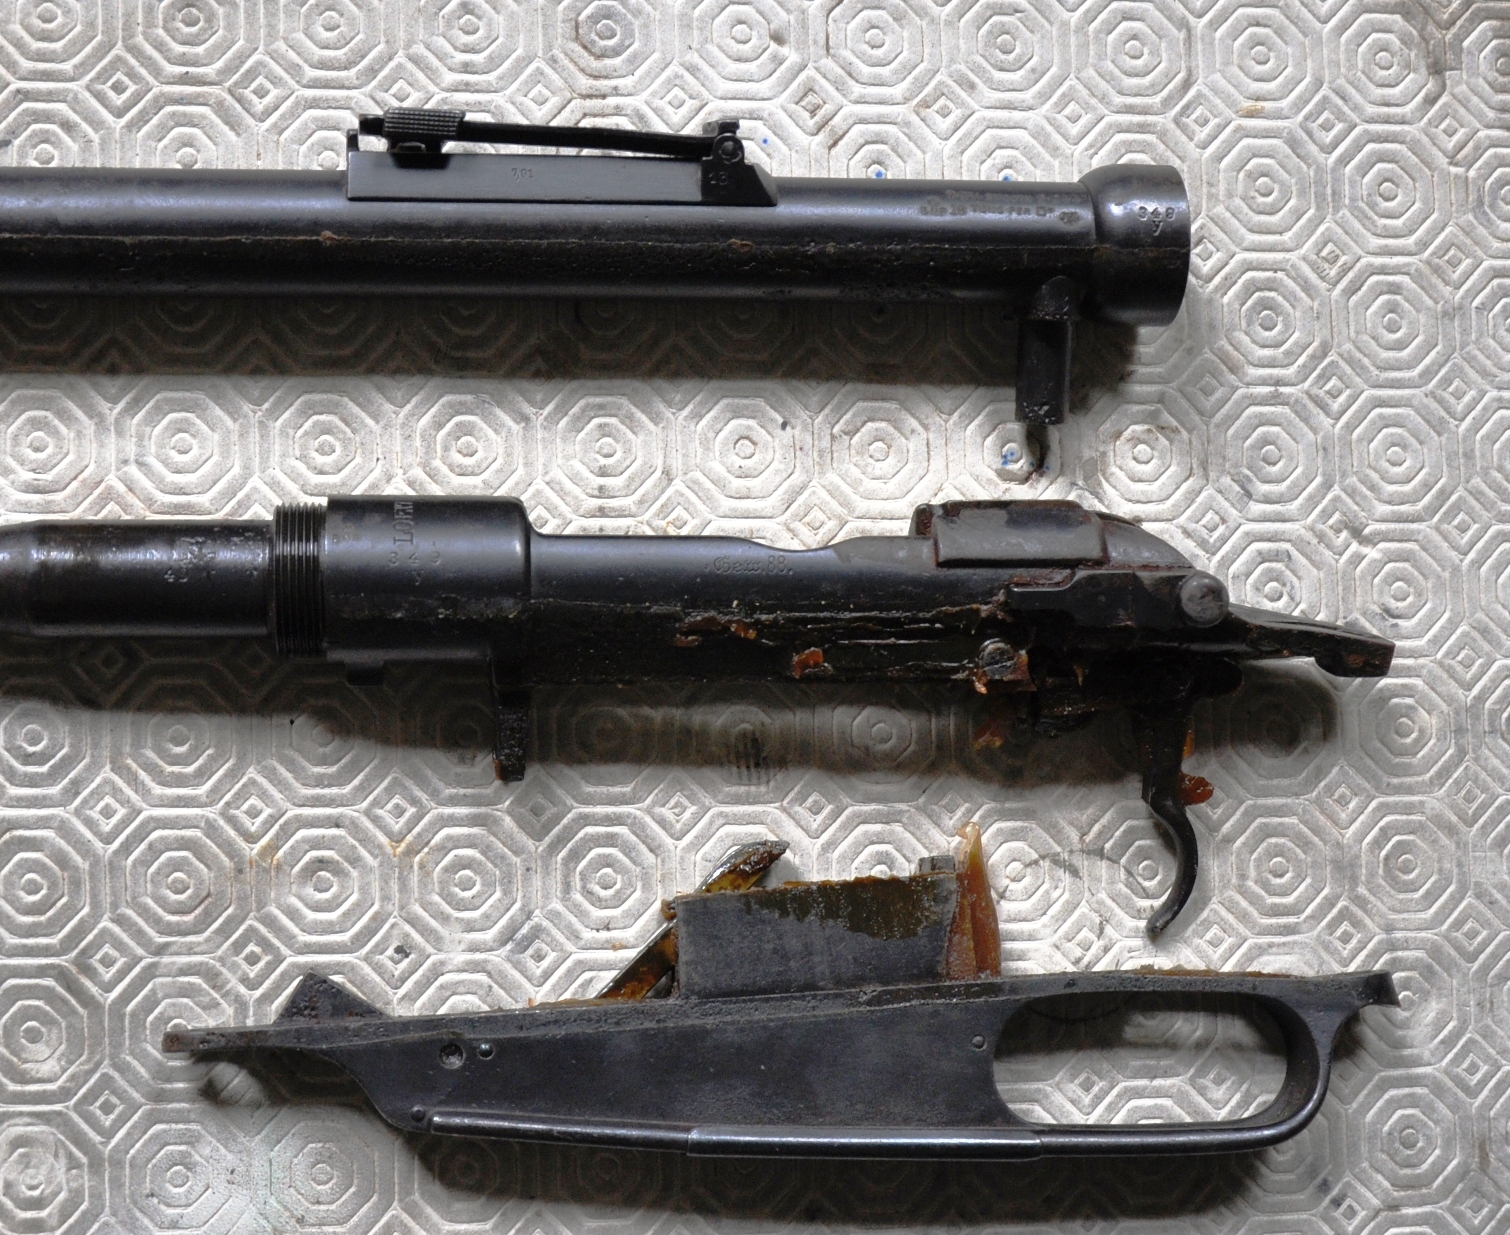
You should now have a barrelled action separate to the stock, keep things tidy by placing the screws and bands in a suitable container, the long screw goes at the back.

Stripped
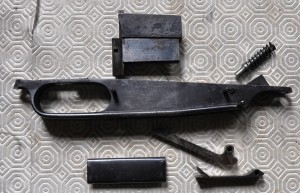
Next job is remove the barrel sleeve by unscrewing it from the front of the receiver, once unscrewed slide it out of position and place it somewhere safe, you should now have something that looks a bit like this.

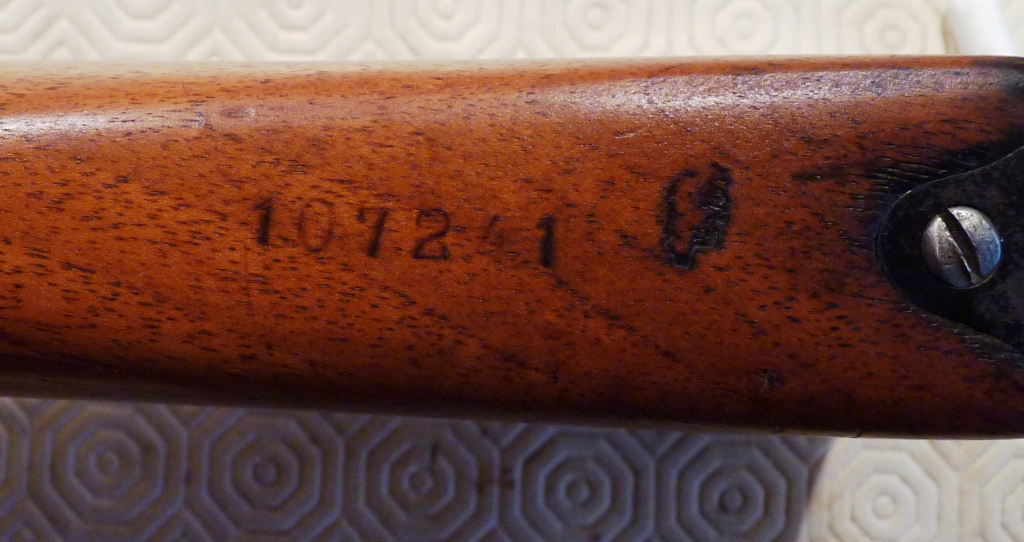
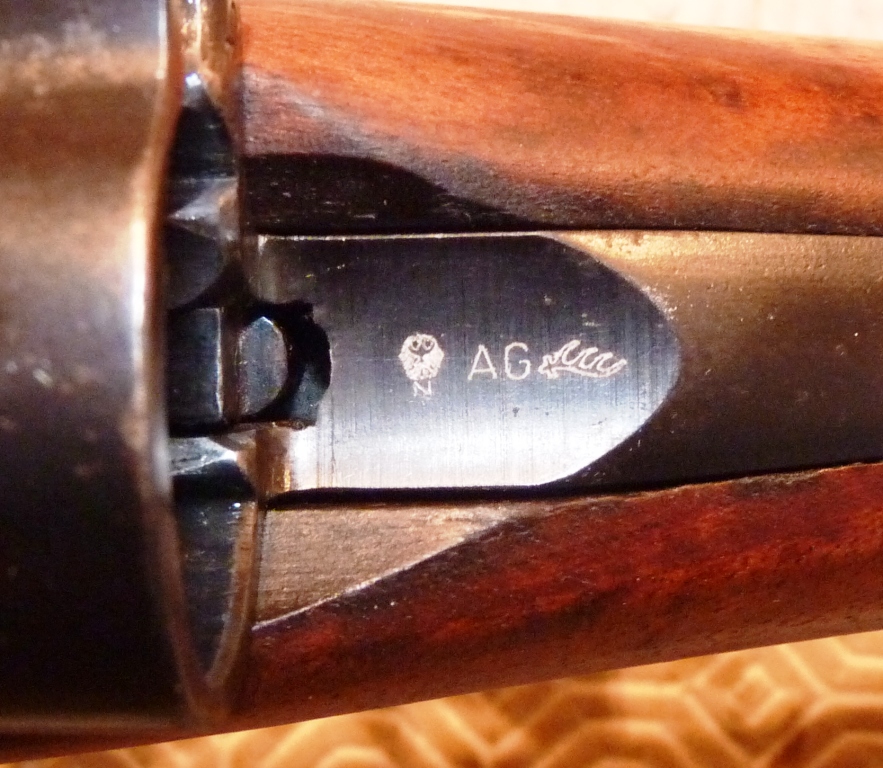
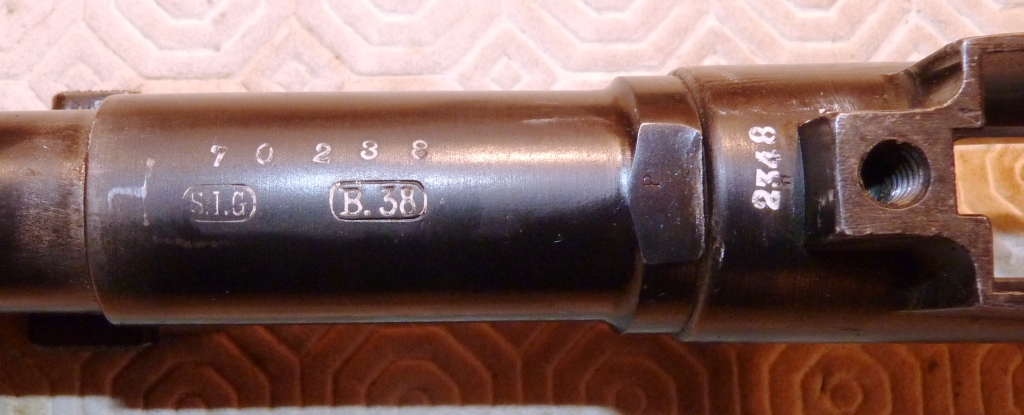
I spent a while thoroughly cleaning everything at this stage of progress and making a note of any markings and potential defects as I went along. A camera is always handy when stripping a firearm you are not familiar with. These days even a mobile ‘phone camera will suffice if you have such a thing. I do indeed have a mobile ‘phone however as normal it was somewhere else, luckily the Viking’s camera was to hand and hopefully she will not notice any grubby fingermarks I may have left on it…

A word on cleaning, I use a variety of processes and materials for cleaning a rifle, a wash tank, lighter fluid and acetone all have their place. A dishwasher is also superb for cleaning larger parts once you have removed the worst of the oil and grease. I will also happily place rifle stocks in a dishwasher if I am going to re-finish them and they will fit, this is also a handy way of raising smaller dents however there is a technique to this and I really do urge you to experiment before stuffing your favourite rifle in a dishwasher once dismantled as you may be in for a bit of a shock.

I also use copious amounts of kitchen roll and old rag such as torn up T Shirts, finally these days I am experimenting with something called ‘Wonder Wipes’ however I am not fully convinced by them when it comes to cleaning old service rifles.

OK, so the rifle is clean now, what next? Well the first picture should give you an idea of the general state of the rifle so first job was the trigger guard.

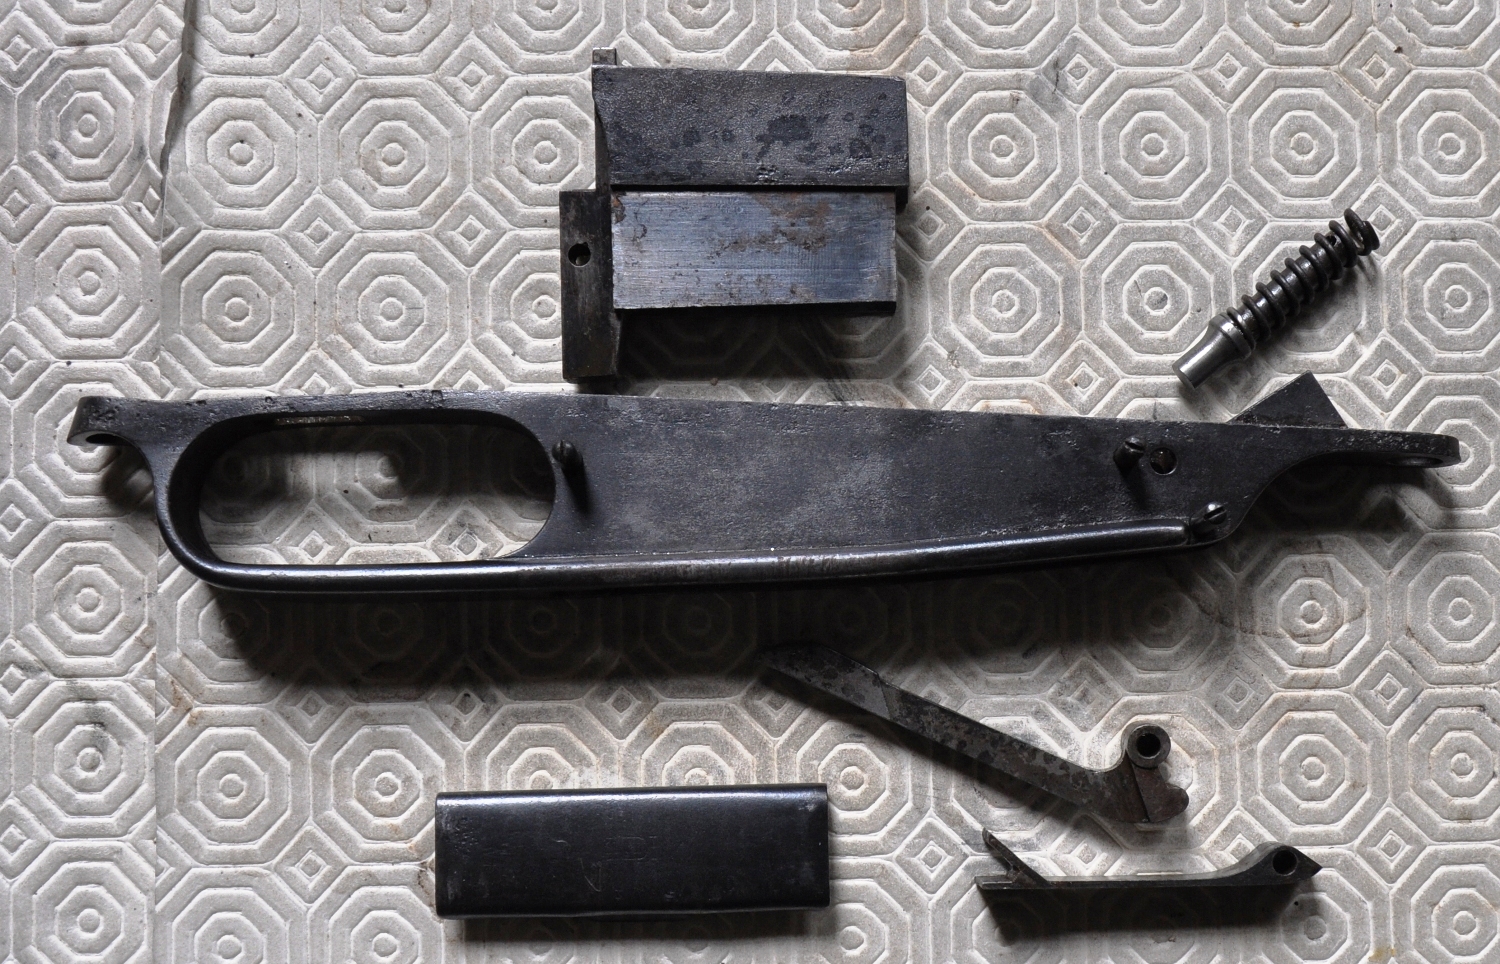
Stripping the magazine and trigger guard process: Remove the lower dust cover if fitted, then depress the spring loaded cartridge follower and the plunger will appear from the rear of the guard, place a suitably sized pin through the hole in it to hold it away from the cartridge follower.

Unscrew and remove the three screws in the guard body.

Drift out the main block from the upper side with a soft drift.

Drift out the rear block with a soft drift, this should be drifted back and down as it has two angled tabs holding it in place.

Lift the cartridge follower out from the underside.

Use a flat bladed screwdriver as a lever top compress the spring and plunger, remove the pin and decompress – take care as it may have a tendency to fly out if it slips.

Reassembling the magazine and trigger guard assembly: This is the reverse procedure of above however here are my notes on the process:

Insert the cartridge follower plunger and spring from the underneath this is easily levered in place with a flat bladed screw driver until the back end of the plunger appears. You will note there is a convenient hole in the rear of the plunger as it emerges and you can pop a pin or small screw driver in here to hold it in place.


Trigger guard and magazineNext insert the cartridge follower from the underneath and hold in place with one of the three screws, you can now depress the cartridge follower against the spring plunger and remove the screw driver or pin used to hold it out and it is now re assembled.

Replace the bottom rear plate, make sure the two tangs are correctly aligned and then carefully tap the plate forwards and down towards the rear with a soft nosed drift until fully in place and secure with a screw.

Finally replace the upper by locating and tapping in place and secure with your remaining screw. Run a function check.

Receiver: The cartridge/case keeper on the G88/05 is held in place by a screw and spring on the left hand side of the receiver, to remove the guide undo the screw, remove the spring, you can now push the guide out with your fingers from the inside of the receiver.

Reverse this procedure to replace, you will notice that the cartridge guide is handed and can only go back in one orientation, the flat spring has a small round section on the opposite end to the screw hole, this engages into the hole on the cartridge guide to lock it in place. Once replaced you should be able to spring the guide in and out with your fingers to confirm operation.

Removing the trigger: Remove the trigger retaining pin that connects the assembly to the receiver with a suitable drift, and remove, taking care not to lose the trigger spring. The trigger can be further dissembled if required however unless you are experiencing specific problems with the trigger and are comfortable with working on such things it is probably best left alone.

It is worth inspecting the sear at this stage while everything is apart to make sure it is not damaged.

Trigger reassembly: Once you have cleaned and inspected the trigger and satisfied yourself that it is ready to be reassembled to the receiver place the trigger spring into the hole and slide the trigger assembly into place whilst compressing the spring. I used a flat bladed screw driver and my thumb to get everything in place and pushed a temporary over length pin in place between the trigger and the trigger hanger.

Once happy with everything tap the original keeper pin back in place, doing it this way ensures everything is correctly aligned. A word of warning, the trigger spring is yet another item that might make a bid for escape so beware.

Check operation of the trigger yet again.


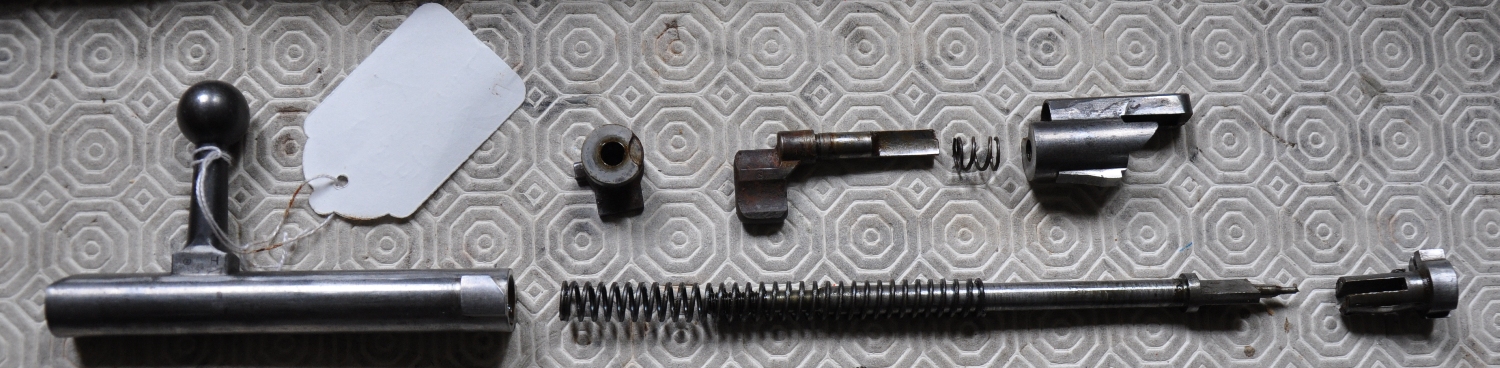
Bolt assembly To reassemble the bolt insert the firing pin into the bolt head, you need to make sure this is correctly orientated which is the lug of the bolt head should be on the same Bolt stripped
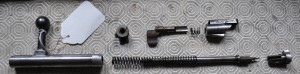
side as the single flat to the rear of the firing pin just before the diameter reduces to the threaded section.

Slide the spring into place over the firing pin ready for assembly, this is my way of doing things however something different might work for you.

I stand the firing pin and bolt head upright and take the bolt in my right hand
with the bolt handle in the palm of my hand, I then push it down over the firing pin assembly and hold it in place under tension. Then locate the rear section of the bolt in place and rotate the whole bolt assembly around the bolt head by a few degrees in an anti clock wise to lock everything in place and stops it from flying apart.

Take care as the firing pin spring is now under compression; if slightly rotated back the whole assembly can fly apart.

Now locate the safety flag and spring into location, you can now screw the cocking piece onto the rear threaded section once you have a few turns on the cocking piece it is safe to let go, the cocking piece should be tightened fully.

Insert the bolt into the receiver and perform a full function test of the action, trigger and safety.

Bolt Safety positions:

Safety catch to left, rifle can be fired.

Safety catch to right, rifle is safe and cannot be fired.

Rifle reassembly: At this stage you should have some nice clean and lightly oiled where necessary sub assemblies ready to go back together. My barrel was in the white and I am going to replace it however I also lightly oiled the barrel before fitting the barrel shroud, I had cleaned the stock internals however I left the external surface virtually as found to maintain the patina of age.

Place the barrelled action into the stock and turn the rifle over, locate the trigger guard in place and secure with the two screws, long at the back, you do not need to tighten these two screws excessively, just nip them up reasonably tight.  I usually make a note of the position of the screw slots before stripping so they can be returned to the same position, it sounds odd however screw tension can really upset accuracy on an older rifle and you can always fine tune tension when you get down the range.

Next slide the rear barrel band into place, any stamps or markings are probably going to be on the left hand side, now slide the front barrel band into place and secure with the screw you put somewhere safe a couple of hours ago, finally screw the cleaning rod back in place and fit the bolt.

You have just completely stripped and reassembled a rifle so run a full function check for bolt release, trigger and safety operation and finally dry fire it a few times to really satisfy all is good.
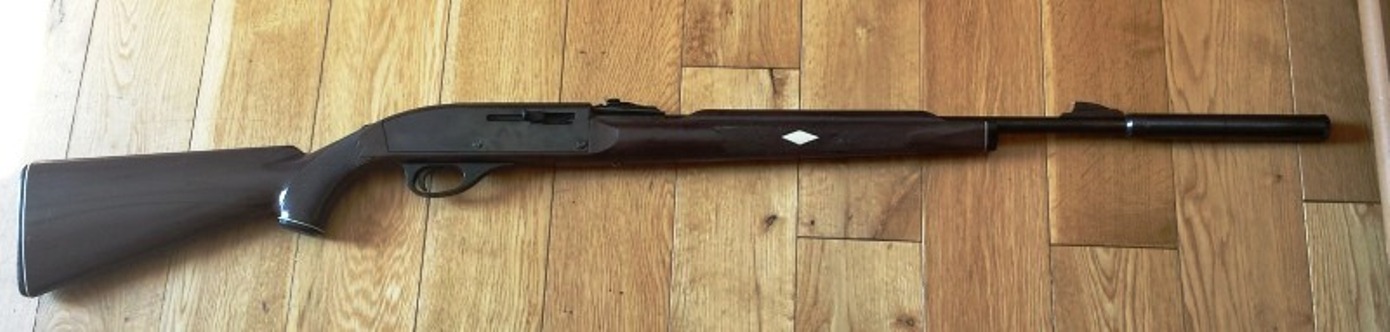
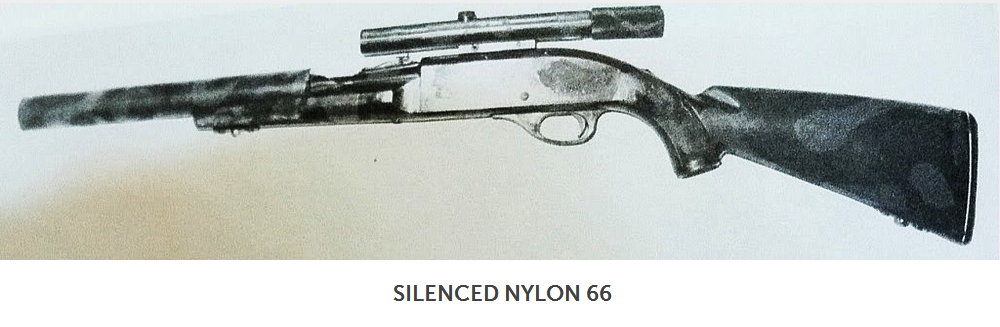
 

The Gewehr88 Commission Rifle

I am slowly becoming a fan of what my wife would describe as ‘Pre Titanic rifles’  So anything designed and built prior to the Great War is of interest so this particular example of a G88/05 Loewe of Berlin model built in 1891 with a very low serial number immediately caught my eye despite it’s rather tired appearance.

I removed it from the rack, checked clear and cycled the bolt a few times savouring it’s slick and precise action. These rifles are often erroneously referred to as the Mauser 88 however Mauser did not design, nor manufacture this rifle however there was a carbine version, the Karabiner 88 for mounted troops which can and is shortened to K88 which sounds rather similar to K98 hence the possible confusion. As well as the full length Infanterie Gewehr Model 1888 and the Karabiner 88 there was also the Gewehr91 for use by the Artillery.

So if not a Mauser who did design it? The German Rifle Commission who also designed the Patrone 88 or M/88 Cartridge and at this point it is important to understand that although this is the forerunner to the 7,92×57 cartridge there are some subtle yet incredibly important differences. The original M/88 had a heavy 8.08 mm (0.318 in) diameter bullet whereas the later variant released in 1905 has an 8,20mm diameter bullet and is referred to as the ‘S Patrone’ (Patrone is German for cartridge) So loading an original G88 or indeed anything chambered for the Patrone 88 with the more modern and larger bullet diameter ammunition is probably going to end badly and it does not end there, even if a rifle of this age is stamped with an S for the more modern cartridge I would still advise against using modern high pressure ammunition in a 110 year old rifle.Gew88


With this in mind I scanned the receiver for any indication of the type of cartridge used and spotted a neat ‘S’ stamped above Loewe Berlin on the receiver. The receiver also has a thumb indent on the left hand side and had the stripper clip slots machined in so this rifle had been modified around 1905 to become a Gew88/05. Things were looking good and it also appeared to bear a fairly recent Proof mark on the barrel shroud. I would need my reading glasses for this bit, hmmm… 8,9mm x 2.244″ Smooth bore – Arghhh! Why on earth has this rifle been smooth bored, well probably because the bore was shot out.

Bugger I thought, a beautiful rifle that was now no longer fit for man nor beast and certainly of no interest to me, yet I heard myself asking.

Me – “How much”

A – “Make me an offer”

Me – “A tenner?” (That is GBP10.00 to us Brits or around USD16.00 last time I looked)

A – “No”.

OK so more than a tenner however pleasantly less than a ‘One-er’ and I am very happy with my latest acquisition.

So what now? Well the proof house has stamped the barrel shroud so a replacement shroud would be handy and luckily they are readily available at very sensible prices. Next a barrel blank and what is more fitting than a modern Lothar Walther steel barrel correctly chambered for the later S Patrone in keeping with the receiver stamp however even then I would be inclined to shoot it with a reduced load. Whilst on this subject do remember that is it perfectly acceptable to have a rifle Proofed here in the UK for a specific cartridge and load.

SoldierWhat about the history of this particular rifle? Well a good indication are the stamps on the barrel bands and this one has:

Front band B.13R.16.52 which I think refers to the 13th Royal Bavarian Infantry, 16th Kompanie, Waffe number 52

Rear band  11.R.R.12.80 (Crossed out)

I will need to drop the barrelled action out of the stock and remove the barrel shroud to see if I can find any further markings to tie up this rifle’s history further and who knows, it might even have been carried by someone like the chap in this picture.

More to follow on this rifle.


Strip and clean the Remington Nylon 66

I decided to take a few minutes out to give the little Remington Nylon 66 a clean up after Friday night’s outing, it looked a bit rough when I peered into the ejector port however it had also shot well so should I be spending time on it, well yes actually I should. My rifles are used to shoot with and I want them to function reliably and correctly plus I always prefer to give new acquisitions the once over so I set to work stripping it down for inspection.

The Nylon 66 is well documented and field stripping is incredibly easy, make sure the rifle is unloaded, cock it and move the safety catch to safe. Remove the cocking handle and take a flat bladed screwdriver, or a coin and unscrew the two receiver cover screws, now lift the receiver cover off, and all is revealed. Arghh….. 66 stripWhat looked like 25 years worth of crud, carbon, grit and sand, it was as gummed up a semi-auto rimfire as I have ever come across and it really does bring home just how good these little things are. Forget about the plastic side of things, I have seen 10/22’s fail in a lot better condition than this 66.

Time to go a bit further. The barrel is removed by slackening off the barrel retaining clamp and sliding the barrel out. The bolt, guide and spring can now be removed as can the firing pin striker, guide and spring and that is about it as far as a field strip goes. Tools required, well a flat bladed screwdriver, a coin or the back of a knife blade is about a much as you need and allow 3-4 minutes tops.

Taking things a bit further I can safely say you can strip this rifle to virtually every single part with not much more tool wise, a bent paper clip is handy for one of the springs and you may need some pointed nose pliers and something to push the pins put however, for the most it is an incredibly easy rifle to strip although you do need to pay attention if this is the first time. The Remington Nylon 66 can be stripped on a kitchen table with only the items in the cutlery draw, or on a sleeping bag with a multi-tool, just keep the parts you remove somewhere safe until they have been cleaned and reassembled.

I did say things were a bit grim inside and it took a while to clean everything, I used kitchen towel, cotton buds, lighter fluid and an AR15 type brush for the really tough parts and made sure to clean and dry every single part so there was no trace of residue, one of the things to remember with the Nylon 66 is it is run clean and dry with no lubricants and I was pleasantly surprised with the way things cleaned up even though there was an ever increasing pile of tissues and assorted cleaning materials going into the bin, the pile of carbon and dirt building up on the rubberised table surface protector was also impressive. One problem I had noted was the Parker Hale MM1 moderator was stubborn to remove and it did take some effort to remove it, the threads were not too bad however the crown is well past its sell by date so I need to deal with that, a job for another day and the good news is it takes just a couple of minutes to remove the barrel. I am not sure what to do with the PH MM1, it is just about finished internally however it does seem to work reasonably well despite the occasional pop over on the first round with subsonic ammunition. I do have a couple of spare cans here that will fit however it would be nice to keep the MM1 that came with the rifle fitted as it is pleasantly old school despite being known in some circles as an air rifle moderator.

Something different – The Remington Nylon 66

I recently spotted an advert on the UK Full-Bore forum for something slightly different to the rifles we usually go for, a Remington Nylon 66. Now if you are reading this from the USA you will know exactly what the Nylon 66 is, however if you are here in the UK and not a follower of older .22 Rimfire semi-autos the 66 might be something you have not come across.

The Nylon 66, named after the material it was built from came about when Remington was owned by DuPont. In the early 50s Remington broached the idea of building a low cost firearm with a synthetic material, DuPont offered Nylon Zytel-101 as a solution and the Range of Remington Nylon rifles were born. The rifle was greeted with some suspicion in the pre ‘Synthetic stock’ days of rifles however tests showed the rifle to be rather successful and certainly durable and the rest, as they say, is history.

The 66 weighed in at 1,8Kgs/4 lbs, had a 14 round butt fed tubular magazine, chambered for .22LR and was produced between 1959 and 1989 and during this period over one million units in different variants were produced.

$_57In addition Remington produced Under-lever and Bolt action versions to cover all tastes. All of which appear to have a very strong and loyal following.

Anyway back to the rifle I spotted, it was fitted with a silencer which is quite a common occurrence for .22 rimfire semi-automatics here in the UK which did mean it had been screw cut and as such was non standard, also it looks like the very front of the forend has been shortened very slightly however I cannot confirm this. Finally it was in Glasgow, Scotland which is virtually a different time zone to us however it has caught my eye and I had to see if I could get hold of it.

As luck had it I knew an RFD who was heading up to see the seller to view a different rifle so I contacted him and asked him to take a look at the 66 and make a call on it. The message came back a couple of days later confirming I was going to be the proud owner of a Remington Nylon 66.

OK so now you are going to ask why on earth I should want such a firearm, my interest/passion for all things over 1000 yards is well documented and lets face it, a .22 rimfire semi is hardly the sort of thing we usually shoot however I had my reasons. The Viking (Wife) seems to have a thing for under-lever Marlins and I equally wanted to own something for shorter distances. On top of this I have a thing for older and more obscure .22s and I seem to see a few come into the workshop for various fixes and tweaks and I quite like the things so why not own the odd one or two or…

Finally, we have recently moved to the Lincolnshire Wolds (The Hilly part of Lincolnshire) and we have a fairly local gallery range so what better to shoot than a .22LR.

Anyway here is the Remington finished in what looks to be like Mohawk Brown with a serial that places it in the late 1960s, I am yet to shoot it however the RFD who picked it up tells me:

Put 80 rnds of Hi Vel American Eagle through it this morning, once I’d got the scope sighted the next 20 rnds knocked the middle out of the ten ring at 25yrds.

Had two stoppages failures to feed, suspect this is nothing that a good clean won’t cure.

So good news and to be honest I had hoped for nothing less.

Apparently the Remington Nylon 66 has been to put to use in all sorts of scenarios and being predominantly Nylon which is thermally stable and self lubricating it has seen use in Alaska and Canada in some extremes of temperature and interestingly was also allegedly used by American special forces in both Vietnam and Cambodia. This application caught my eye for a variety of reasons. The first being the use of what is probably a Sionics suppressor, I have worked on a variety of suppressor designs in the past and my Accuracy International sports a very effective prototype reflex suppressor and is used routinely to 1200 yards with supersonic ammunition. This version of the Nylon 66 featured what looks to be a 13″X1-3/8″ diameter can, along with a lock on the right hand side to prevent the rifle cycling the next round, this would mean no noisy escaping gasses or rattle of bolt.

Given the slightly non standard state of my rifle it is certainly food for thought.


The Steyr SSG 69 P1

OK, so this is not a Danish Rifle however it is European so well worth a mention.

A Steyr SSG 69 P1 complete with a ZFM 6x42Z Scope and Q/R rings numbered to the rifle arrived today and I have to admit I have always been a bit of a fan of these rifles.

Originally designed back in 1969 for the Austrian Army the Scharfschützengewehr 69 (Sniper Rifle 69) was a bit unusual. For starters it had a 6 lug rear locking bolt 18,9mm bolt and a synthetic stock. The hammer forged 1:12 650mm barrel chambered in 7,62×51 NATO was a push fit into the receiver. It featured a rotary type magazine and came as standard with open sights as well as a Kahles 6×42 ‘scope fitted with quick release rings and it was a sensible weight. Possibly most impressive was the accuracy with a claimed 0.5MOA or better with factory ammunition. A claim that has been proven on many occasions.

RHS

This particular SSG 69 P1 dates from February 2002 and is fitted with the factory Swarovski ZFM ‘scope. These days Swarovski own Kahles so it is pretty close to the original. SSG P1Graduated out to 800m the elevation drum is divided into 0,25 Mils clicks with the windage 0,1Mils or 2.5cms/click and 1cms/click at 100m. The reticle is a three post affair with limited range finding capability.

The horizontal centre line is 0,15 Mils thick and 14 Mils wide and the vertical post is 1,5 Mils wide so something to work with. Quite what the elevation cam is calibrated to remains to be seen, my guess is something around 150 grains at 2800fps.  The turrets are quite ‘manly’ to operate with clearly defined clicks.

The bolt stroke is short at around 89,0mm and the 6 lugs give a lift of around 60 degrees. I have read reports of the bolt lugs letting go and the bolt coming back when fired out of battery. All I can say is YEAH RIGHT! My opinion is this is yet another internet myth, I have spent a few minutes testing and I just cannot see how the rifle could be fired out of battery. As for snapping lugs off, well cram enough super fast powder into a case and it will probably lock up, however as to shearing lugs…

The trigger is a good old military type two stage trigger that is adjustable for length of first stage and break from 1 ,1 – 1,8kg / 2,47 – 4,04lb. This rifle is at the upper limit and I see no reason to change this significantly.

Cosmetically this rifle truly is superb and unmarked with the original parkerised finish as it came from the factory and the green synthetic stock, butt spacers and trigger guard in equally perfect condition. All in all a very nice rifle and one I am looking forward to getting down to the range.

A foreigner! The M1896/11 Schmidt Rubin

Hmm… should I even be posting this. It is certainly not a Dansk Gevær, not even Scandinavian, so why is it here? Well Christel did a deal on this rifle many months ago however for a variety of reasons it never actually got shipped to us until just a few days ago.

Made in Switzerland, this particular M1896/11 was manufactured in 1910 as part of a run of 6,300 rifles of that year and was upgraded to /11 specification sometime between 1913-20 with improvements including a barrel chambered in 7,5×55 to take advantage of the new GP11 ammunition. In total 127,000 M1896/11’s were built.

So what we have here is a service rifle for the Swiss Army which means there is a very good chance it was never used in anger, in fact given Switzerland’s neutrality it should have had an easy life, the thing is had it?

SR1896_11


Only one way to find out, pull it apart!

The woodwork was in suspiciously good condition and closer examination showed a number top rear of the butt that did not match up with the iron work, new wood maybe? I dropped the stock bands off, removed the upper hand guard and interestingly the number stamped on the underside matched the receiver, bolt and barrel which was encouraging. The magazine displays the same number as well so all matching metal so far. Removing the trigger guard/bottom metal revealed a trigger and guard that matched and of even more interest the stock also has the same number as the rest of the rifle stamped inside so it is an all matching rifle in that respect. I have no idea what the different number on the upper side of the stock is for.

General condition, well the bore was already shiny however I set to work with a wipe through with a cleaning product I am testing and whilst that was doing it’s work I had a chance to check the rest of the metal work over. Some minor surface rust was visible on the receiver however this wiped off, the bluing has lightened with time but is still quite fine and the inside although oily soon cleaned up.

The bolt on the M1896/11 is an odd affair as the rifle is a straight pull however it strips very easily without tools and again is in good condition. I stripped and assembled the bolt a few times and found myself getting quite slick at the process however I am not really at the blindfolded stage for this. I will time myself on the process some day 🙂 I do find the operation of the bolt quite clunky and this seems to be down to the bolt release catch which acts as a stop as well, it uses quite a powerful spring so the bolt needs a good yank to open, hardly into Swiss wristwatch territory.

The barrel twist is 1:10.63″ so quite capable of coping with a heavy bullet and GP11 uses a 174 grain bullet. It is well documented that the GP11 bullet design was well studied by the US Army Ordinance during the development of the 30-06 round. On the subject of the barrel I had steadily scrubbed the barrel with ‘Product X’ and the amount of blue showing on the last few patches was steadily diminishing so I passed a couple of water damped patches through and had a chance to marvel at the amount of carbon fouling that came out before it eventually patched clean. I finished with an oiled patch and reassembled the rifle. About the only thing left to do now is shoot it and check the bedding screws, the accuracy can be skewed if the tang screw is incorrectly tightened, the best place to check this is on the range which will be some time in the new year.

So is the Viking pleased with it? She tells me she thinks it is a cracking looking rifle, personally it seems to fall into the SOWR category which she has fallen head over heels in love with. I will stick to my Accuracy International..

UPDATE –  A quick post to the Gunboards forum regarding the second number on the stock received this reply:

…that other serial is the cantonal arsenal inventory number dating from the days it was still a 1896

Wikipedia tells me:

The 26 cantons of Switzerland are the member states of the federal state of Switzerland. Each canton was a fully sovereign state with its own border controls, army and currency from the Treaty of Westphalia (1648) until the establishment of the Swiss federal state in 1848. The most recently created canton is the Canton of Jura, which separated from the Canton of Bern in 1979.

The name is derived from the French language word canton meaning corner or district (from which the term Cantonment is also derived).


UPDATE – After some more research (OK I mostly asked questions on the SRDC forum) I can update this post.

This particular M1896/11 was built in 1910 almost certainly at the Canton of Bern Arsenal and updated sometime between 1913 and 1920 with new rear sights and a barrel built by SIG. The rifle remained in service until 1948 when the soldier the rifle had been issued to elected to keep his firearm upon his retirement. In 2006 the rifle was proof tested by the Beschussamt Ulm (Ulm Proof House in Germany) So it is fairly safe to assume it had left Switzerland and was in Germany, sometime later it ended up in the UK and was purchased from the owner in August 2012 and eventually arrived home end of December 2012.

Fascinating stuff!

Now some details.

Sadly the stock has been scrubbed at some point so there is not a lot to be see, however you can still see the original Bern Arsenal inventory number and on the end is what looks like a bear which denotes it was built at Bern

P1010377

The tang shows AG which is the German year code for 2006 and the antler to the right is from the Ulf Proof House.

Tang

The P.48 shows a soldier chose to take this rifle with him when he left the Army in 1948, I am not sure what the N behind the sight means and there is also a heart on it’s side on the barrel I cannot find any reference to.

Receiver upper

Bottom view shows the barrel came from the SIG factory however I am not sure what the B.38 refers to, something SIG again maybe? I assume the serial is that of the barrel prior to fit.

Receiver lower

I find this make of rifle quite fascinating and I am looking forward to finding out a bit more about the marque, I have already suggested Christel could do with another one!